Learn how to Migrate Hosting & Domain From GoDaddy to Bluehost
If you are looking for the guide to ‘transfer your hosting and domain from GoDaddy to Bluehost’ then you are at the right place, we have an easy solution to it. we have recently switched hosting providers and it was a surprise, how easy the whole process is. Here We’ll show you how to move a WordPress site from GoDaddy to Bluehost in 11 easy steps.
In this guide we will discuss about, how to transfer hosting providers manually (without the help of any plugin). Even If you are not a tech-savvy at all, it will take less than an hour to move your site from GoDaddy to Bluehost.
Step 1: Sign Up With Bluehost Hosting.
The First step, you need to follow is to sign up for a web hosting account with Bluehost. To do so, CLICK HERE — you’ll get a 63% discount on the monthly hosting price + a free domain name for the first year. This is a special price for our readers, you can host your blog with them for as little as $2.95/month.

After you click on the green Get Started Now button, you’ll be asked to select a hosting plan (for a single blog, the basic plan would be enough for you).
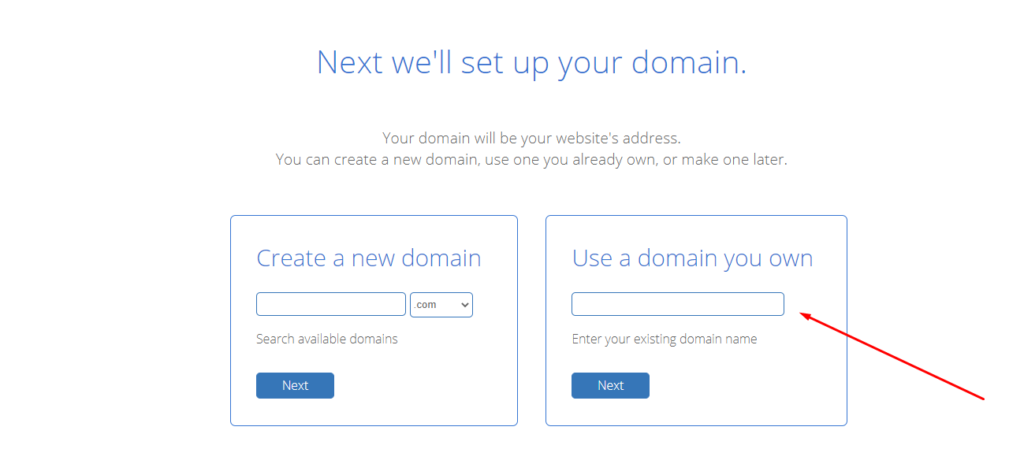
On the next page, type your existing domain name (the one you’ve been using with GoDaddy) in the Use a domain you own field.

Now you need to enter your details, choose the length of your plan (I recommend the 36-month one because this way you can save some money), you can also add Domain Privacy in your cart, and pay. At the end, you’ll be asked to create an account password. That’s it!
Step 2: Download your WordPress files
First Log into your GoDaddy account.
Click on the Web Hosting tab and then click Manage.
Now you’ll be taken to your cPanel. Under the Files section, locate the File manager icon and click on it.
After that, a new page will open. On the left-hand side panel, look for the public_html folder. When you click over it, its contents will appear in the panel to the right. These are all your WordPress files.

Now look for the Select all checkbox in the sub-menu over the files and select it and click Compress in the upper menu.
Choose Zip Archive when choose for the format and hit Compress files.
Remember the Archive location of the zipped file. By default, the target location should be the very same public_html folder.
Once the compression process done, you’ll see the newly created zip file, now click over the compressed file and click Download from the top menu to download your WordPress files to your computer.
Step 3: Export your GoDaddy database
To export the database of your website, go back to your cPanel and scroll down to the Databases section, there you’ll find the phpMyAdmin .
On the left-hand side, you will see your databases with names. Click on your website’s database. The database will expand in the panel to the right, and you will see various tables appearing, like options, comments, posts, etc.
Now look for the Export button and click it.
Here you’ll be asked to choose the Export method , Select Quick and chose Format as SQL. Now click the Go button on the down-right corner. The database will be saved to your computer.

Step 4: Change domain nameservers
Now go back to your GoDaddy account by clicking My Products at the top of the page and this time click the Domains tab.
then choose the Manage DNS option.
A new page will open, now scroll down until you find the Nameservers section.
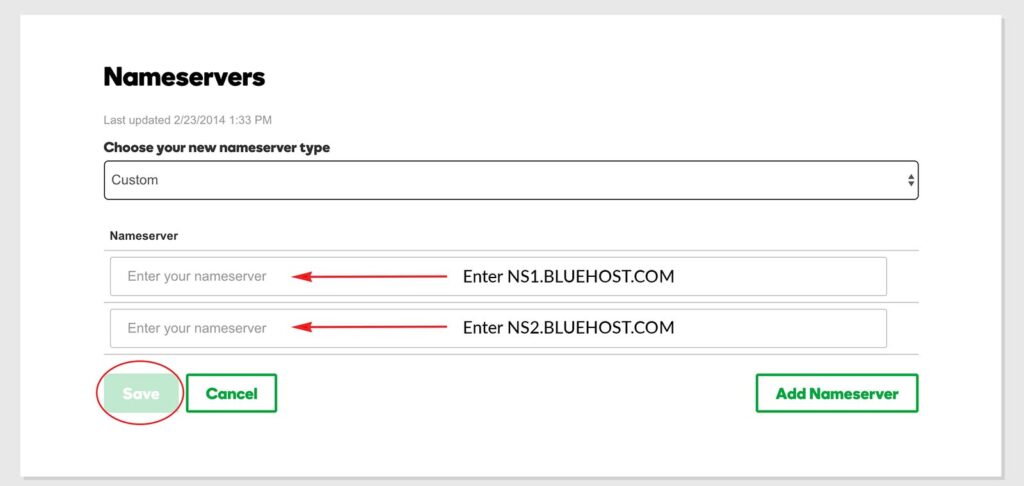
Now click the Change button.
Insert the Bluehost nameservers(that you received by email when you signed up for the Bluehost hosting) in the place of GoDaddy nameservers . The Bluehost nameservers usually look like this NS1.BLUEHOST.COM and NS2.BLUEHOST.COM

Step 5: Assign your domain to your Bluehost cPanel
This time Log into your Bluehost account and go to the cPanel.
Now scroll down to the Domains section and click Domain manager
Choose Assign from the top menu
Pick the second option Use a domain that is not already associated with your account and type in your domain name like MyDomainName.com

Now scroll down choose addon vs. parked and make sure Addon domain is selected.
Now in Next step: choose addon directory and sub-domain, you need to Create a new directory like this: public_html/MyDomainName. As a subdomain use MyDomainName (replace with your own domain name)
Click Assign this domain
Step 6: Transfer WordPress files to Bluehost
Now you have to login to your Bluehost account, go to Hosting in the top menu.
Scroll to the down, find the Files section and click File manager. A popup will open asking you to select the directory you wish to open. now check the box with the name Document Root for and select your domain name from the drop-down list and hit Submit.
Now click Upload in the top menu to upload the zip file you downloaded from GoDaddy in the second Step. Now the tricky part arrives, if your zip file is more than 150Mb, you will have to upload it via FTP. In this case, go back to the hosting menu and select FTP from the top menu. You will have to create a new FTP account and download FileZilla to your computer (it’s a free software).

Select the zip file and hit Extract, Once the file is completed and uploaded.
Step 7: Create a new database in Bluehost
In this step login to your Bluehost dashboard again, and look for the Database section and click MySQL Databases.
Now create a new database, ie. database1. Click Create database Link and note down the database name (including the prefix) because you will need it in the next step . Your database name will look like this prefix_database1

After creating a new database, Now scroll down to add a new user, ie. user1. Add a password and write down your username, prefix included – prefix_user1 + password and hit Create a user.
Add the newly created user to the database you’ve just created and hit Add.
Step 8: Move database to Bluehost
Go back to the Database section in Bluehost account, but this time select phpMyAdmin.
On the left-hand side panel, look for the database you have created in the last step and click over it (if you can’t see it, click on the + sign to expand the folders). The right-hand side panel will be empty.

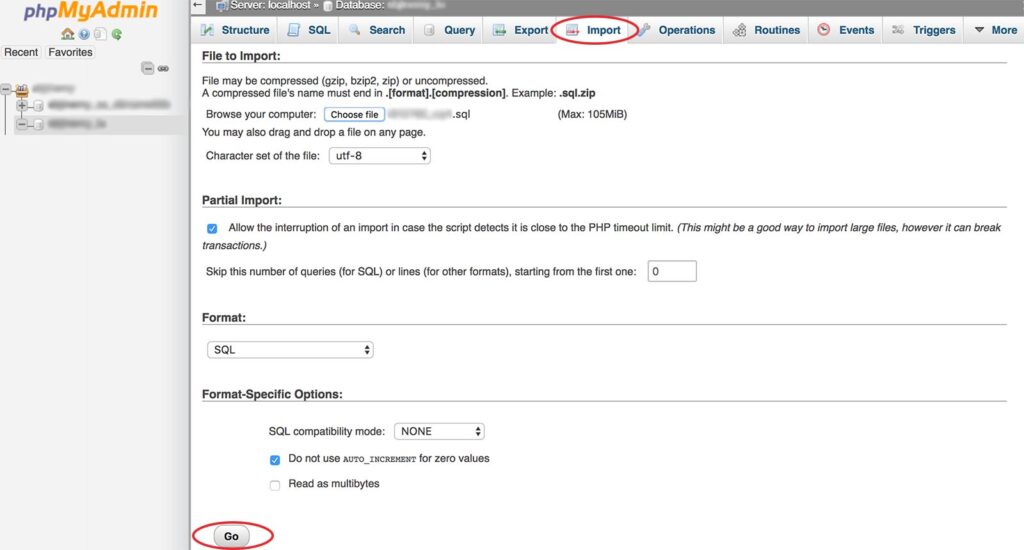
Now Import the database you downloaded from your GoDaddy account.
Click Go to start the import of the database.
Step 9: Edit Wp-Config.php file
Go to the Bluehost Hosting in the upper menu.
Scroll down to the Files section and click File manager as we did before. Select the directory from the popup asking for the directory to choose, check the box named Document Root for and select your domain name from the drop-down list and click Submit.
Now select wp-config.php file in the root directory where all the wordpress files are present.
Right click over the file and open this file with Code editor.
Now find the DB_NAME, DB_USER, DB_PASSWORD and change the parts highlighted with the database name, username, and passport created in step 7 and Save it..

Step 10: Save permalinks
In this step you need to log into your WordPress dashboard to save the permalinks by Going to settings > Permalinks and then press Save twice to make sure the permalinks are saved properly on the database.
