Things To Keep In Mind Do Before Building Your Website


Hostinger

Building a website now a days is not that hard anymore , but choosing the best practices while making your website is more important.
We have compiled some tips to help you get started with your website:

Define the goal of your website:

Why do you need a website? is a million dollar question you should ask to your self, along with other questions like, what visitors you wants on your website?, and what would be action you want your visitors to take?

Choosing Hosting and Domain Name for Your Website:

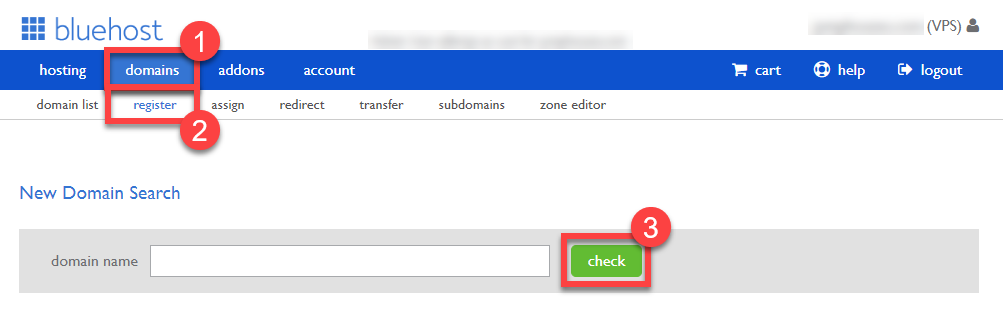
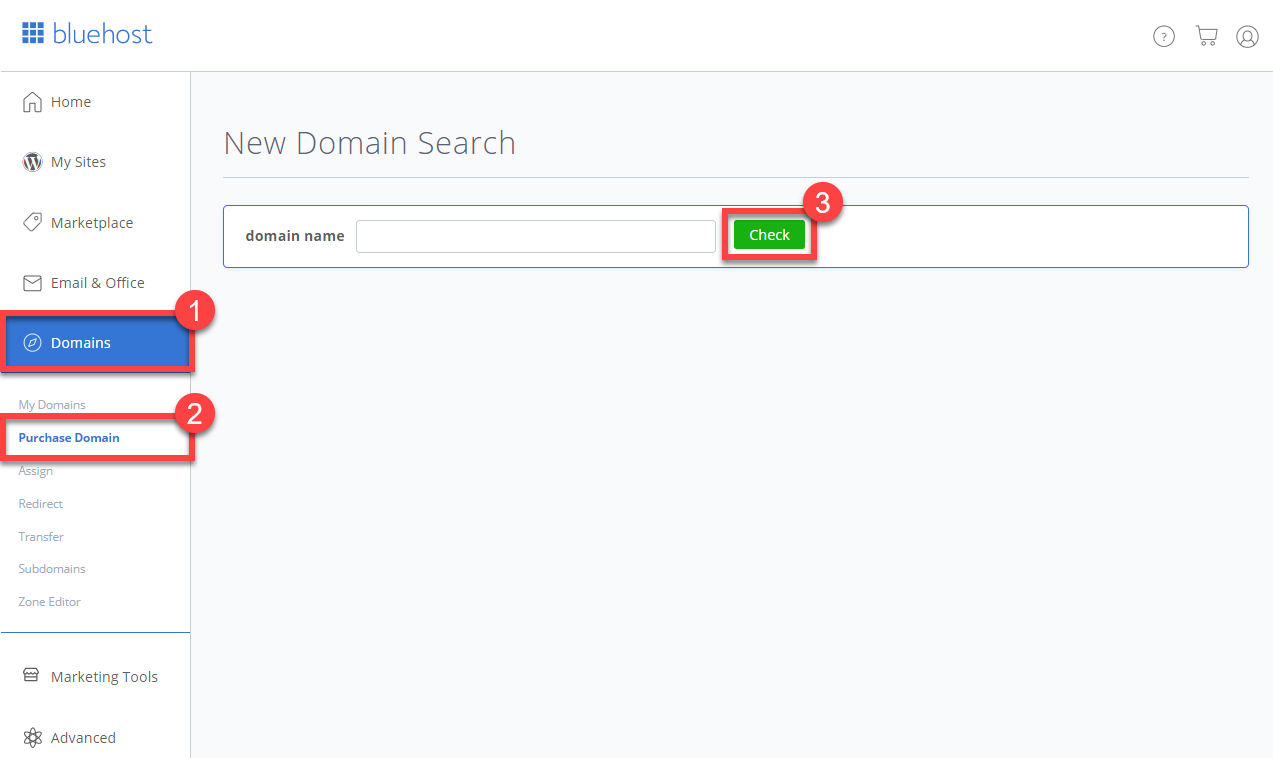
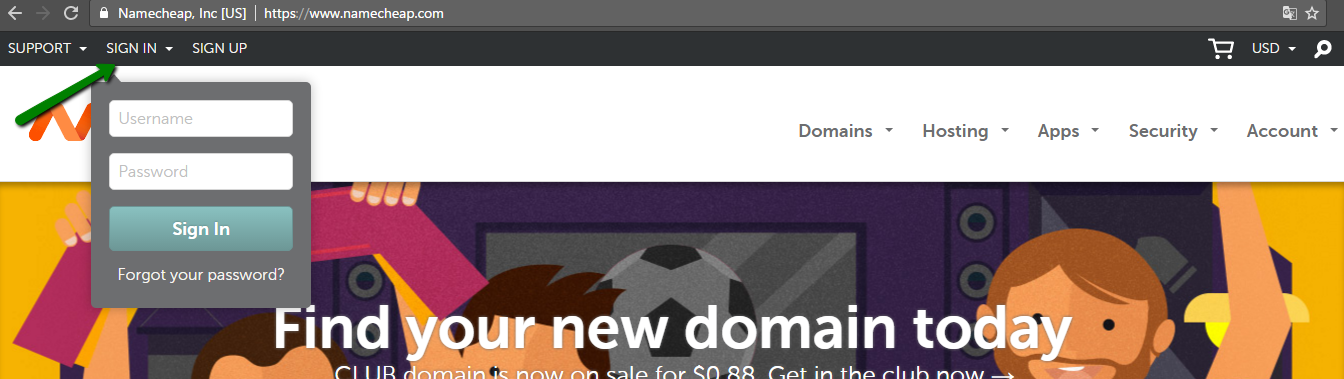
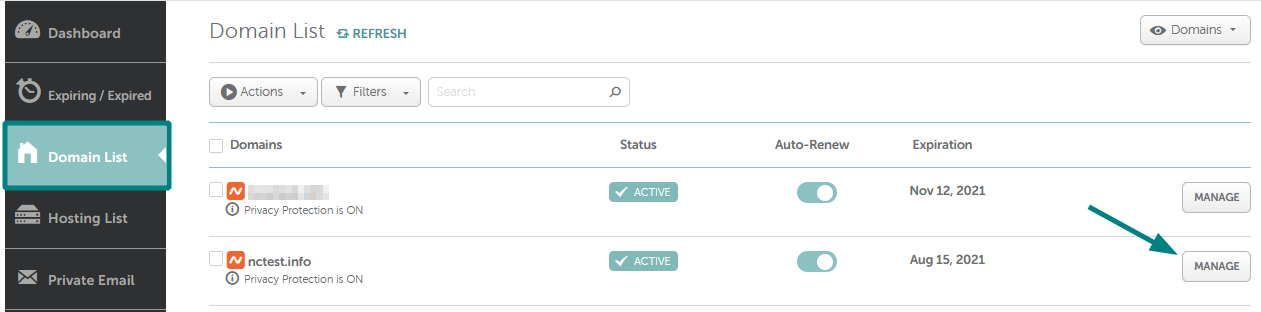
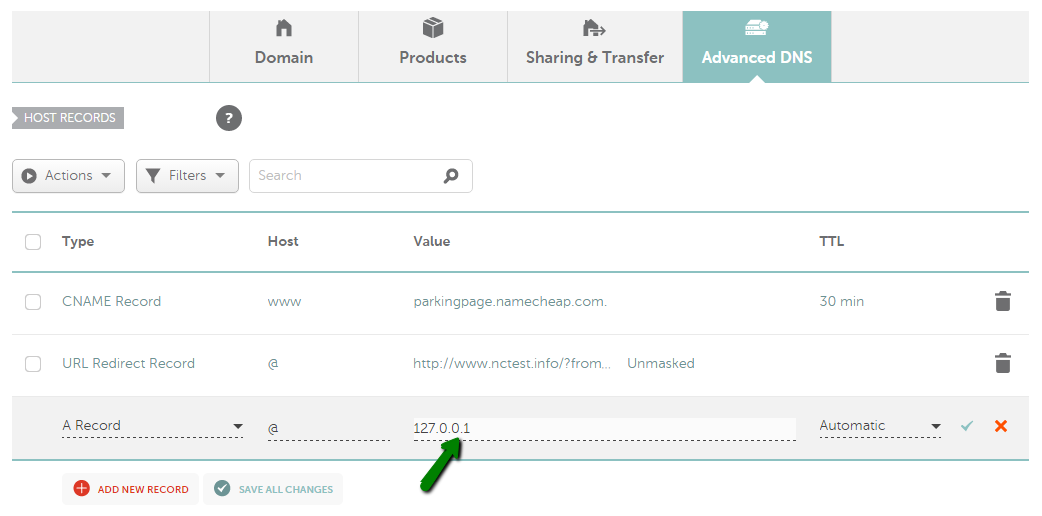
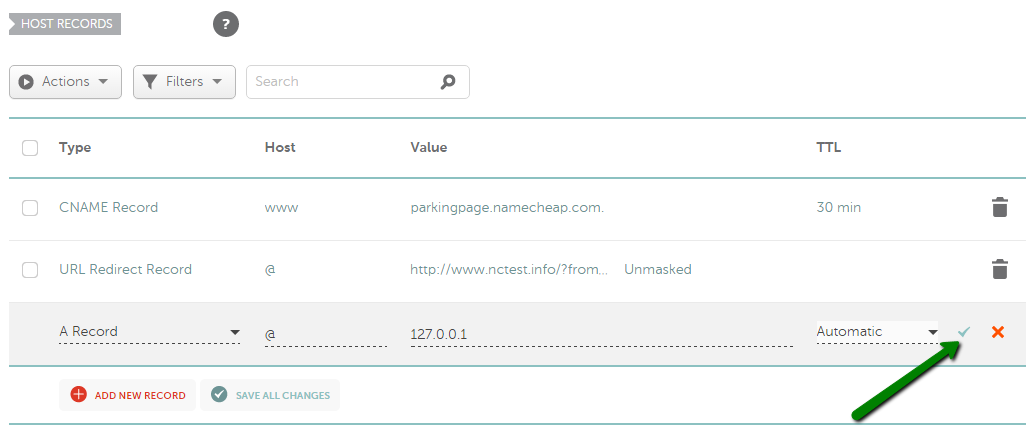
Hosting and Domain names are the essential part of creating a website. If you want to save your self from facing the future problem of transferring your website from one hosting to another  which is a time-consuming process, you need to pay attention and get professional help while choosing these for your site.

We have a detailed article on choosing a domain and hosting for your site, you can read them here: Choosing a Domain Name , Choosing a Top Hosting .

Define the Template and Responsive design of your website:

A well-designed website can help you form a good impression on your potential visitors. It can also help you to increase your leads and get more conversions. But, more importantly, it provides good user experience and helps your website visitors access and navigate your website with an ease.

Website design vector

Make sure your website is responsive on all the devices, 80% of the traffic of the website came from the mobiles as per google.

Branding for your Website:

Every site needs a brand now a days! with it you cannot compete with the millions of sites over the internet,  The process of designing your site and creating a brand for it, will be much simpler and more efficient if you start with the clear branding guidelines.

Color Scheme, Fonts, and images you will select for your website will be the base of your website and how it will reflect on your customers.

While you are a beginner, branding of your site not necessarily be expensive, it could be simple but unique to attract the readers.


HostPapa.com 100% Green Energy Web Hosting

Difference Between Domain Name and Web Hosting?


Bluehost.com Web Hosting $3.95

What is Domain Name?

Beginners usually wonders what is the difference between domain and hosting. We have tried to explain the difference between the two.

If you want to visit any house, we need it’s address to find that house or to visit it.

In the same manner, We need to type the website’s address in the address bar of the browser to visit that website, here domain name is the address and the hosting is the house. 

To understand it in more details, first understands the WordWideWeb( WWW) Concept. It’s basically a giant network of the computers connect to each other with the help of routers and switches. Here each computer is assigned a number to identify them easily, this number is called an IP Number or IP Address.
Computers used IP Address in numerical form 192.168.1.1 to identify them, but to read it easily and remember by the humans Domain Name was introduced.
Now if you want to visit any website you don’t need to enter the string number 104.21.4.198 instead you can type blackhostess.com.

Read our article on ‘Best Domain Names Registrars’  if you want to choose Domain name for your website.

What is Web Hosting?

As we discussed earlier Hosting is the house if Domain is the address of that house.

To have a website over the internet you would require a place where you can place your site’s files, its called Web Hosting.

Your domain is connected to your hosting, multiple domain can be connect to a single hosting.

When some one types the address/domain name of your website, he/she will be redirected to your site and will show’s the content placed in your hosting. 
Site’s speed and performance also depends in the hosting.


Read our article on Top Hosting Providers to learn more about choosing the right hosting for your website.


Popular Domains for just 99 Cents at Namecheap!

WordPress installation guide for beginners


HostPapa.com 100% Green Energy Web Hosting

Overview

This guide will show you how to install WordPress using the most popular methods:

Installing with the aid of Softaculous, a popular Auto Installer which helps users install applications quickly and easily.

For those who want to do it themselves, we offer a step-by-step guide to manual installation.

Installing WordPress With Softaculous App

To install WordPress manually the first step you would follow is to log into your cPanel of your hosting.

Select the Softaculous Apps Installer icon. 

Install wordpress

Click the WordPress logo.

Click Install tab to proceed.

Install wordpress

Now you need to fill out the details of your WordPress installation.

Install WordPress

Enter the domain you wish to install on this WordPress .

Choose the root folder for this installation. Leave the  Directory field empty as by default

Database Name can be left as the default as well.

You can change the default wp_  Table Prefix, but to enhance  security, we recommend to changing it to something unique, like wpwebsitename_.

Enter the website name 
( you can change in the customizer in the WordPress dashboard later). 

Now hit Install when you’re ready.

Installing WordPress Manually

Step 1: Download WordPress 

Visit the wordpress.org site and download the latest version of the wordpress.Save the .zip file in a memorable location. once the file is saved now prepare to upload it to the hosting.

2. Upload WordPress to your hosting account

There are many ways to upload the WordPress files in to the hosting. You can use the file manager in the Cpanel as well as the FTP using the filezilla (a free desktop software).

Using cPanel

Uploading WordPress files using file manager in the cPanel is the most easy and most efficient method.

For this propose go to your cPanel of your hosting and scroll down to find the File Manger and click it.

Once you in the file manager window, click the  upload button in the upper header, a new window will open and let you choose the file on your computer.

Using FTP

Using FTP to upload the files is relatively a slow process as compared to using cPanel. but mostly used in case your hosting has no cPanel access.

After installing the FileZilla, (refer to this guide if you don’t know how to install FileZilla on your computer ) Connect it to your hosting with the details you get after  creating the FTP account on your hosting.


Setting up your database and users

In the previous steps we have uploaded the files only,  to complete the process we have to create a database also, which will store the website information. 

Login to your cPanel, now scroll down to Databases and click the MySQL Databases icon. Enter your  new database name, we suggest you to keep it simple and something easy to identify, and click Create Database.

After creating the new database , next step is to create a new user for this database. Give permission to the new user by select All Privileges option.

Install WordPress

To complete the installation process so you can have your website, there are few steps you need to follow.

Now to get this screen you need to visit this address http://exampledomain.com/wp-admin/install.php with your blog/website’ domain, if you placed your files in the Root Directly.

If you have placed the files in the subfolder, you would visit the link like this, http://exampledomain.com/myblog/wp-admin/install.php.

Select the primary language of the website in the nest step , and select ‘Lets Go‘ when WordPress asks you to choose the database first.

Enter the Database details you have noted while creating the database and database user as show in the image.

After submitting the correct details of your database you would be taken to your newly created WordPress website’s Dashboard.


Hostinger

Learn how to Migrate Hosting & Domain From GoDaddy to Bluehost


Bluehost.com Web Hosting $3.95

If you are looking for the guide to ‘transfer your hosting and domain from GoDaddy to Bluehost’ then you are at the right place, we have an easy solution to it. we have recently switched hosting providers and  it was a surprise, how easy the whole process is. Here We’ll show you how to move a WordPress site from GoDaddy to Bluehost in 11 easy steps.

In this guide we will discuss about, how to transfer hosting providers manually (without the help of any plugin). Even If you are not a tech-savvy at all,  it will take less than an hour to move your site from GoDaddy to Bluehost.

Step 1: Sign Up With Bluehost Hosting.

The First step, you need to follow is to sign up for a web hosting account with Bluehost. To do so, CLICK HERE — you’ll get a 63% discount on the monthly hosting price + a free domain name for the first year. This is a special price for our readers, you can host your blog with them for as little as $2.95/month.

BlueHost Homepage

After you click on the green Get Started Now button, you’ll be asked to select a hosting plan (for a single blog, the basic plan would be enough for you).

On the next page, type your existing domain name (the one you’ve been using with GoDaddy) in the Use a domain you own field.

BlueHost

Now you need to enter your details, choose the length of your plan (I recommend the 36-month one because this way you can save some money), you can also add Domain Privacy in your cart, and pay. At the end, you’ll be asked to create an account password. That’s it!

Step 2: Download your WordPress files

First Log into your GoDaddy account.

Click on the Web Hosting tab and then click Manage.

Now you’ll be taken to your cPanel. Under the Files section, locate the File manager icon and click on it.

After that, a new page will open. On the left-hand side panel, look for the public_html folder. When you click over it, its contents will appear in the panel to the right. These are all your WordPress files.

Now look for the Select all checkbox in the sub-menu over the files and select it and click Compress in the upper menu.

Choose Zip Archive when choose for the format and hit Compress files. 

Remember the Archive location of the zipped file. By default, the target location should be the very same public_html folder.

Once the compression process done, you’ll see the newly created zip file, now click over the compressed file and click Download from the top menu to download your WordPress files to your computer. 

Step 3: Export your GoDaddy database

To export the database of your website, go back to your cPanel and scroll down to the Databases section, there you’ll find the phpMyAdmin .

On the left-hand side, you will see your databases with names. Click on your website’s database. The database will expand in the panel to the right, and you will see various tables appearing, like options, comments, posts, etc.

Now look for the Export button and click it.

Here you’ll be asked to choose the Export method , Select Quick and chose Format  as SQL. Now click the Go button on the down-right corner. The database will be saved to your computer.

Step 4: Change domain nameservers

Now go back to your GoDaddy account by clicking My Products at the top of the page and this time click the Domains tab.

then choose the Manage DNS option.

A new page will open, now scroll down until you find the Nameservers section.

Now click the Change button.

Insert the Bluehost nameservers(that you received by email when you signed up for the Bluehost hosting) in the place of  GoDaddy nameservers . The Bluehost nameservers usually look like this NS1.BLUEHOST.COM and NS2.BLUEHOST.COM

Godaddy name server


Hostinger

Step 5: Assign your domain to your Bluehost cPanel

This time Log into your Bluehost account and go to the cPanel.

Now scroll down to the Domains section and click Domain manager

Choose Assign from the top menu

Pick the second option Use a domain that is not already associated with your account and type in your domain name like MyDomainName.com

Now scroll down choose addon vs. parked and make sure Addon domain is selected.

Now in Next step: choose addon directory and sub-domain, you need to Create a new directory like this: public_html/MyDomainName. As a subdomain use MyDomainName (replace with your own domain name)

Click Assign this domain

Step 6: Transfer WordPress files to Bluehost

Now you have to login to your Bluehost account, go to Hosting in the top menu.

Scroll to the down, find the  Files section and click File manager. A popup will open asking you to select the directory you wish to open. now check the box with the name Document Root for and select your domain name from the drop-down list and hit Submit.

Now click Upload in the top menu to upload the zip file you downloaded from GoDaddy in the second Step. Now the tricky part arrives, if your zip file is more than 150Mb, you will have to upload it via FTP. In this case, go back to the hosting menu and select FTP from the top menu. You will have to create a new FTP account and download FileZilla to your computer (it’s a free software).

Select the zip file and hit Extract, Once the file is completed and uploaded. 

Step 7: Create a new database in Bluehost

In this step login to your Bluehost dashboard again, and look for the Database section and click MySQL Databases.

Now create a new database, ie. database1. Click Create database Link and note down the database name (including the prefix) because you will need it in the next step . Your database name will look like this prefix_database1

After creating a new database, Now scroll down to add a new user, ie. user1. Add a password and write down your username, prefix included – prefix_user1 + password and hit Create a user.

Add the newly created user to the database you’ve just created and hit Add.

Step 8: Move database to Bluehost

Go back to the Database section in Bluehost account, but this time select phpMyAdmin.

On the left-hand side panel, look for the database you have created in the last step and click over it (if you can’t see it, click on the + sign to expand the folders). The right-hand side panel will be empty.

Now Import the database you downloaded from your GoDaddy account.

Click Go to start the import of the database.

Step 9: Edit Wp-Config.php file

Go to the Bluehost Hosting in the upper menu.

Scroll down to the Files section and click File manager as we did before. Select the directory from the popup asking for the directory to choose, check the box named Document Root for and select your domain name from the drop-down list and click Submit.

Now select wp-config.php file in the root directory where all the wordpress files are present.

Right click over the file and open this file with Code editor.

Now find the DB_NAME, DB_USER, DB_PASSWORD and change the parts highlighted with the database name, username, and passport created in step 7 and Save it..


Step 10: Save permalinks

In this step you need to log into your WordPress dashboard to save the permalinks by Going to settings > Permalinks and then press Save twice to make sure the permalinks are saved properly on the database. 


How to Register a Domain Name with Bluehost

Domain name is an essential part of your website’s online presence, choosing it wisely would be potential, so visitors will remember you.

LEGACY

1. Log in to your Bluehost account.

2. Click the Domains menu and then click the submenu link named Register.

3. Enter your desired domain name and click Check.

BlueHost Domain registration(source)

4. Scroll down the list and click the shopping cart icon for any domain you’d like to add to your cart.

5. When you’re ready, click Proceed under the shopping cart list on your right.

6. Choose your renewal setting: auto-renew or manual renew.

7. Check the box to add Domain Privacy (optional).

8. Read and agree to the Terms of Service.

9. Click Add to Cart.

ROCK

1.First you need to log in to your Bluehost Control Panel.

2. Now look for the Domains tab from the left-side navigation and click it.

3. Click the Purchase Domain option from the sub-navigation.

4. Enter the domain name you wish to register, then click Check.

 
Bluehost Registration

5. Click the cart icon next to an available domain, then click Next.

6. Review the Registration Settings and click add to cart.

7. Apply payment details and checkout.

Advanced tips for choosing a domain:

Keep it Simple: Look for a single word domain name that has one possible spelling. Choosing a simple domain name without confusing spelling will make it easier for your visitors to reach your website.

Shorter is Better: The shorter your domain name is, the easier for your visitors to remember your website. it should be maximum of 15 characters.

Avoid Hyphens: Using hyphens can really be hard to remember it, remains into someone’s memory would be difficult and there is high chances for the visitors that they will ends up at mydomain.com If you register domain with hyphen  my-domain.com .

Consider Other Extensions:  After finding the perfect domain name ending with .com, it would be w a great idea to pick up other  extensions like .net, .org, .info, .us, etc. so you can park these domains to point to your actual account to catch up any visitors that just may happen to type in a different extension.

Choose With Rich Keyword:  While this does not impact much on SEO, but it can help. For example, if people are searching for “florida luxury resorts,” floridaluxuryresorts.com could be a great domain to buy for with only fact that it is exactly what people are searching for.

Avoid Slang:  Using slang words like ‘ur’ instead of  ‘your’  should also be avoided as they don’t really work. For instance, ursite.com is a bad substitute for yoursite.com.


Bluehost.com Web Hosting $3.95

How to Connect a Domain to a Server or Hosting in Namecheap Account

Setting up a domain name is much easier than you may think. Once you choose your domain name &  is registered, you need to connect it to your hosting server.

NameCheap

1. You have a hosting plan with Namecheap.

If you have a Stellar, Stellar Plus or Stellar Business plan  you need to point the domain to namecheap web hosting DNS nameservers (dns1.namecheaphosting.com and dns2.namecheaphosting.com).
If the domain is registered with Namecheap, it can be easily done in your Namecheap account in the following way:

1) Sign into your Namecheap account (This option can be found in the header of the page):

2) Please select Domain List from the left sidebar and click the Manage button next to your domain in the list:

Namecheap Domain(source)

3) Look for  the Nameservers section and select Namecheap Web Hosting DNS from the drop-down menu. Then use the checkmark icon to save changes:

Namecheap Domain(source)


Professional Hosting fro Just Host

2. You have a hosting plan elsewhere and you were provided with the nameservers for your domain.

To connect a domain to a third-party server or hosting plan via nameservers that you received from your hosting provider, you need to set these nameservers as Custom for your domain. You can do that in the following way:

1) If you have already signed in to your account, select Domain List from the left sidebar and click the Manage button next to your domain in the list. Then find the Nameservers section and select Custom DNS from the drop-down menu:

Namecheap Domain(source)

2) Then, enter your hosting nameservers one by one in each line (if you need to set more than 2 nameservers, press the Add nameserver red button). When the nameservers are entered, press the green checkmark to save changes:

namecheap domain

(source)
It may take about 24-48 hours for your domain to propagate after the nameservers update to be resolving properly all over the world.

3. You have your own server or you were provided with a set of host records to connect the domain to your hosting.

If you have your own hosting server and you already know its IP address, you have to set up ‘A records’ for your domain in order to connect it to the server.

1)We assume that you have already signed into your account, next step would be to select  the Domain List from the left sidebar and click the Manage button next to your domain in the list. After that switch to the Advanced DNS tab at the top of the page:

Domain Name cheap

(source)

2) Now look for the Host records section and click on the Add New Record button.

name cheap domain

(source)

3) Now choose A Record for the Type and then enter the Host you would like to point to your server IP address:

Namecheap Domain

(source)

4) After adding the Host, you can now enter the IP address of your hosting server into the Value field:

Name cheap Domain

(source)

5) After that, You can leave the TTL as Automatic (30 min) or choose other custom value from the drop-down list:

name cheap domain

(source)

6) Pleas make sure you have entered all the details in to the fields, now you can save them using green icon:

namecheap domain
(source)

Normally, this process takes about 30 minutes to take effect for the newly created records.